|
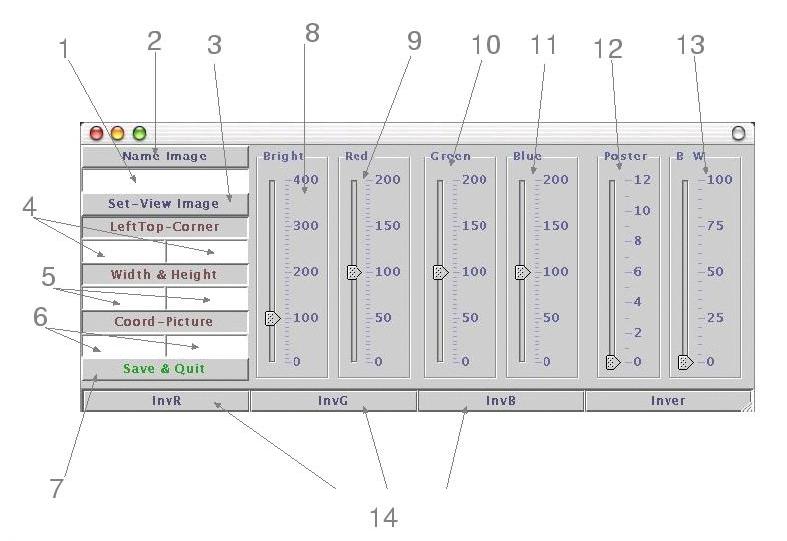
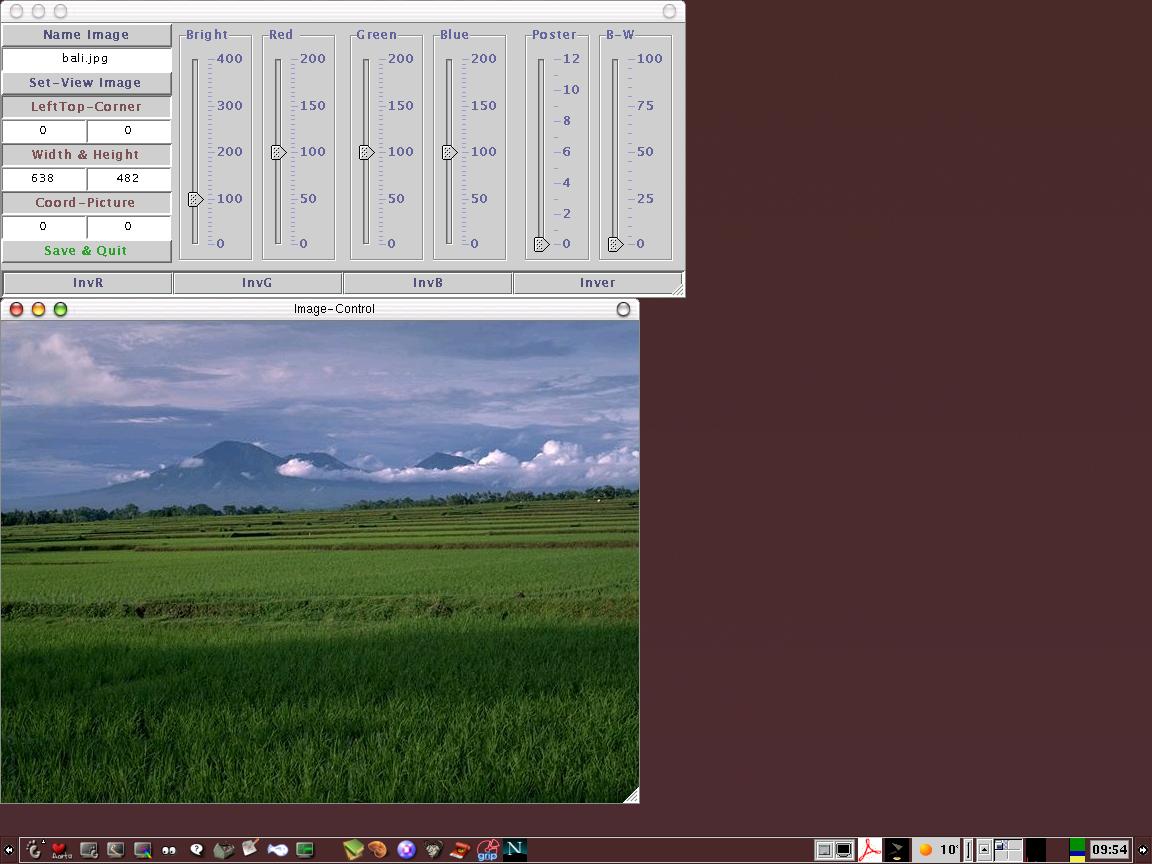
In what follows it will be expalined the basics to use MpFot as a standalone application. Shortly, it will be included in METAGRAF-3D that will call a clone of MpFot which will work in the same way. So this Manual serves for both cases. This application only works to the final point in Unix. In Windows some script must be done (will be done) to obtain the final result. This "final result" as MpFot is presented here, is a PDF image-file but this can be changed to obtain a PS-MP file or both (see the README file). When MpFot is launched trought " java -jar Imatot.jar " and after a few seconds the working panel will appear. This panel really comprises everything needed to work with the application. See below to the picture (created with MpFot inside METAGRAF) for the explanation that follows. |
En lo que sigue explicaremos el funcionamiento básico de MpFot como aplicación independiente. En breve se incluirá en METAGRAF-3D una versión casi-clónica de MpFot cuyo funcionamiento será similar por lo que este Manual servirá igualmente Para obtener un resultado completo de MpFot es necesario trabajar con Unix en cualquiera de sus variantes. Próximamente escribiré los scripts necesarios para su correcto funcionamiento en Windows. El fichero que se obtiene en la versión actual es el correspondiente a una imagen en PDF. Se puede modificar el script para obtener el fichero de salida de MetaPost. Vease el fichero README. Cuando se lanza MpFot a través de la instrucción " java -jar Imatot.jar " y tras unos breves instantes el panel de trabajo de la aplicación aparecerá. Este panel reagrupa todos los comandos disponibles en esta primera versión. En la figura de abajo puede seguirse la explicación. |
|||||||||||||||||||||||||||||||||||||||||||||||||||||||||||||||||||||||||||||||||||||||||||||||
|
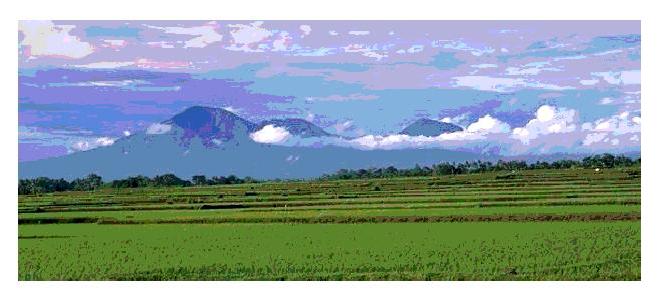
As can be seen, the numbers refers to buttons, sliders, textfields ... etc. The first thing to do once the working panel appears is to click in the textfield with number "1" and to write the complete name of a picture (including the path if it is not in the same directory). If the picture that comes with the application is to be used, it must be written "bali.jpg". Once done, the button number "2" with the title "Name Image" must be clicked. Then the action of rasterizing the image is done and in the fields "4", "5" y "6" some numbers appears. In fields "4" and "6" there will be zeroes. In field number "5" it will be shown the width and height of the picture. As units, always pixels are used (0.25 mm in most cases). Then button "3" (Set-View Image) must be clicked. It will appear the picture selected. If "bali.jpg" is used, here can be seen the result. With these actions the first part of the work is done. If it is wanted to put exactly the total picture as it is seen in the upper left corner of a page, clicking the button "7" (Save & Quit) would be the action to take. But if some treatment of the image or modification of its placement is wanted, it is necesary to use the tools "ad hoc". In what follows, these tools will be explained. |
Como la imagen nos muestra, los números que aparecen con sus flechas indicadoras, se refieren a botones, deslizaderas, campos de texto ... etc. Lo primero que se debe hacer es un click en el campo de texto "1" para que aparezca el cursor, y escribir el nombre que le hayamos dado a la imagen, incluyendo el "path" si no está en el mismo directorio desde el que hemos lanzado el programa. Dicho camino puede ser relativo al directorio en que estemos. Si utilizamos la foto de la distribución, bastará que escribamos "bali.jpg". A continuación, hay que "clickar" el botón "2" con el título "Name Image". En unos breves instantes, los restantes campos de texto se llenarán con números. El "4" y el "6" contendrán sólo ceros y en el "5" aparecerán las medidas en pixels del ancho y alto de la figura. Haciendo click en el botón "3" ("Set-View Image"), se lanzará el panel de imagen con la foto elegida. Si se ha elegido la fotografía incluída en la distribución, aquí puede verse el resultado. Con lo anterior, la primera parte de nuestro "trabajo" ha quedado terminada. Si queremos colocar la imagen seleccionada en su totalidad y tal y como nos ha aparecido en la esquina superior izquierda de una eventual página, bastará con pulsar el botón "7" ("Save & Quit") para terminar el trabajo gráfico. Si, por el contrario, queremos dar algún tipo de tratamiento a la imagen o colocarla en otro sitio, deberemos utilizar las "herramientas" disponibles. En lo que sigue explicaremos dichas herramientas. |
|||||||||||||||||||||||||||||||||||||||||||||||||||||||||||||||||||||||||||||||||||||||||||||||
The tools included in this distribution are of two kinds. On one side there are the brilliance, color, posterize and saturation tools controlled with sliders and the "inverse color" tools controlled with buttons. On the other side there are the "sizing", cropping and placement tools controlled with numbers to be written (shortly I will implement a better, more profesional way of cropping). Now, let's explain how these tools work:
The buttons included with the number "14" for all three, just change one of the color of the original image to it's inverse, in the order from left to right used everywhere, so: red, green, blue. (The button at the bottom right corner, "Inver", has no application yet.). The "geometrical tools" alow for cropping and placement of the picture. The cropping is controlled by two text fields, number "4" and "5". It is possible to write on any field just clicking on it. The textfield number "4" defines the upper left corner from which the final picture will be selected. The other one, number "5", defines the final width and height of the resulting picture. Althought grafically is a lot simpler, the numerical method is quite straight forward once used to it. It is good practice to have always in mind that 1 cm. is just 40 pixel, or an inch, 100 pixels. It is important to understand that the program will not accept impossible values and can crash. For example if some values different from the original zeroes are written in textfield "4" the values in textfield "5" MUST be changed, as it is impossible to maintain the same width and height of a picture wich upper left corner is inside this same picture. It is important to mention that the origin of soordinates for those values is the same upper left corner of the image. Finally, the textfield number "6" serves to define the coordinates where it is wanted to place the upper left corner of the picture in it's final result. But now we are referring to the "general coordinates" of a sheet type A4 or Letter, etc., where we want our final image to be placed. With what has been said, we have given a general idea of the capabilities of MpFot. Now it is needed to explain how the tools are used and some peculiarity as the way of comparing the original image and the transformed one before creation of the final file. It will be convenient to "slide the courtain" to let see the final picture. |
Las herramientas incluídas en esta primera version de MpFot son de dos tipos. Por un lado están las relacionadas con la propia imagen, en cuanto a colores, tonos, luminosidad ... etc., y por otro las relacionadas con la geometría deseada para la imagen final y su colocación en la hoja virtual. En lo que sigue vamos a explicar en qué consisten esas "herramientas":
Los botones señalados con el número 14 ejecutan la acción de cambiar cada uno de los tres colores por sus correspondientes inversos, de forma que pulsando una vez todos ellos se obtiene el negativo (sin tinte de fondo) de la imagen. Estos botones son de tipo cíclico de forma que cada vez que se pulsan cambian el estado. Una pulsación activa la inversión del color. La siguiente pulsación sobre el mismo botón la desactiva. El botón de la esquina inferior derecha con el rótulo "Inver" no tiene función asignada en esta distribución. Las herramientas "geométricas" sirven para "recortar" y colocar la imagen en el lugar deseado. El proceso de recorte se controla a través de los campos de texto "4" y "5". En principio se puede borrar o escribir cualquier campo de texto sin más que hacer un click con el ratón en el campo deseado y actuar en la forma habitual. El campo de texto "4" sirve para definir las coordenadas de la esquina superior izquierda de imagen. El "5" define su anchura y altura, de forma que si modificamos los valores del campo "4" que por defecto son cero, (ya que estos valores se refieren a unos ejes coordenados que tienen su origen en ese punto), necesariamente tendrenmos que modificar los valores del campo "5". Sería imposible considerar la imagen a partir de un punto cualquiera interior a la misma y querer tener la misma anchura y altura. Por tanto cometeremos un error y el programa se puede bloquear. En cualquier caso, lo máximo que podremos hacer es que la anchura que demos sumada a la coordenada x que hayamos colocado en el campo "4" sea igual a la anchura original total. Lo mismo para la altura. Finalmente, el campo de texto "6" sirve para definir la posición de la imagen final colocada en una hoja de tipo A4 u otro que vayamos a usar. Se trata por tanto de un sistema de coordenadas referidas a la propia "hoja" final. Esto puede resultar un poco confuso hasta que no se entiende bien. Por ello en breve prepararé un sistema de recorte gráfico, de tipo estándar y que evitará confusiones. En el próximo Metagraf, esto es mucho más sencillo ya que el posicionamiento se hace sobre el panel de dibujo moviendo la imagen como cualquier otro objeto con el ratón. Con lo anterior hemos dado una imagen general de las posibilidades de MpFot. En lo que sigue explicaremos cómo se utilizan estas herramientas y sobre todo cómo podemos visualizar los cambios introducidos y compararlos con la imagen original. |
|
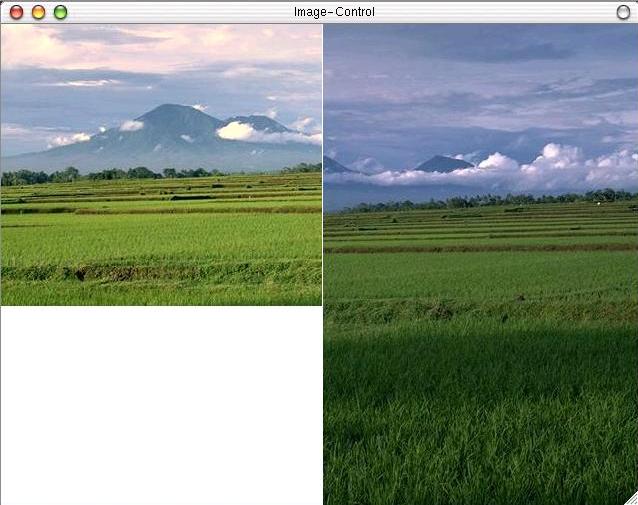
One very nice feature of MpFot is the way used to compare and fine tune the image desired. When the panel with the original picture appears, after clicking on button "3", and if some chage is wanted, the way to do it is as has been already explained, moving the sliders or clicking the buttons of the MpFot panel. For those changes to take effect, it is necesary to click once more the button number "3". (For that reason, this button usually must be clicked many times.). Once done, the changes are done, BUT the image on the panel remains unchanged. To see the changes and compare both images, original and transformed, the image-panel must be clicked on any point near the left border and the mouse must be dragged to the right. Then the new image appears as if "a courtain is slided" with the mouse. The picture above shows an instant in which this operation is being done. Really, it is possible to click on any part of the panel, and if it is done in the right part, the transformed image appears in its totallity. Nevertheless, the fact of dragging the mouse is curious and interesting as the changes appears joint to the original image so the comparaison is easier. In the way just explained it is possible to fine tune the final image, see the effects that has been incorporated, and choose the final transformation. Everytime something is changed, to make it true the button "Set-View Image" must be clicked. Finally, when the corrected image is o.k., the only thing to do is to click on button "7", with the title "Save & Quit", and after a few seconds all panels will desappear. At this moment it must be written: "./doit.sh" and after some compiling a new file with the name "mpfot.pdf" will be found in the same directory. it can be viewed with "acroread" or "gv". The image can be obtained also as a postscript or metapost file. See the README file for those modifications on the distribution. |
Un aspecto muy agradable de trabajar con MpFot es la forma establecida para comparar y ajustar la imagen modificada. Cuando el panel con la imagen original aparece después de pulsar el botón "3" y si se desea hacer algún cambio en la imagen original, la forma de hacerlo es a través de los botones, deslizaderas y campos de texto explicados anteriormente. Para que los cambios se lleven a cabo, se debe pulsar una vez más al mismo botón "3". Se debe pulsar dicho botón siempre que se aplique un cambio o se corrija uno ya hecho. Cuando se pulsa los cambios se realizan, pero en el panel de la imagen, aparentemente nada cambia. Para ver el cambio se debe hacer click con el ratón en un punto cualquiera en la zona izquierda de dicho panel y sin soltar el botón del ratón arrastrarlo hacia la derecha. Entonces, como si estuviéramos "corriendo una cortina" aparecerá la imagen transformada. Conforme movamos el ratón a derecha o izquierda veremos la imagen original o la transformada, con lo que se puede apreciar el efecto de los cambios en cualquier parte de la imagen con una precisión total. El proceso se muestra en la ilustración de arriba. Finalmente, cuando el resultado resulta totalmente satisfactorio (aquí hay que hacer una llamada de atención relativa a la poca fiabilidad que suelen proporcionar los monitores habituales si se los compara con las impresoras utilizadas) podemos terminar la sesión sin más que pulsar el botón "7" ("Save & Quit"). Tras unos segundos los paneles de MpFot desaparecerán y ya podremos escribir: "./doit.sh" y pulsar ENTER. Los ficheros serán procesados y al final un nuevo fichero se habra creado en el mismo directorio con la extensión por defecto "PDF". Si se prefiere obtener el fichero generado por metapost, se dan instrucciones sobre la forma de hacerlo en el fichero README de la distribución. |
SANTIAGO MUELAS, April 2001.