
METAGRAF has changed. From the first alpha release one year ago to the present version, there are many changes.. We, J.J.Arribas and S.Muelas, are proud of the work done and the results we have obtained. Nevertheless, every time we put something new in the program, we think of a lot of other things that would also be useful. So, since MG's license is GPL, we will create a CVS repository in Source Forge where we hope to receive the help that, up to this moment, we haven't had.
We will try to explain the many capabilities of MG and we hope to be understandable. Our apologies for any inconveniences.
This introduction as not a substitute the User's Manual, which comes distributed with MG. It is, rather, a complement emphasizing the important and interesting points. And it should be easier to read than the manual. The idea is to begin by reading these pages (which can be downloaded "on the fly" with any browser) and then begin using Metagraf while simultaneously reading the Manual.
For reading this introduction, We strongly recommend the use of Amaya or Opera, both of which can be downloaded freely.
And now, onto business!
The present version has many new useful features. Some will show the impressive future possibilities of MG.
Here is a short list of the newest improvements:
And now it's time to begin with the detailed explanations of how to use MG and how to exploit its capabilities to the maximum.
It is very important to understand the preferred way of working with MG. The capability to group objects has been improved in this latest version. Working with groups is now a lot quicker and safer. This means that if some optimization is wanted it is recommended to group objects as soon as they are finished. Working with groups simplifies a lot some common tasks. For example, we can create "composite objects" that, once finished, will not be modified any more. For those cases I have included the button "ATTACH" on the right. Once a few objects are "attached" in a group they can not be ungrouped anymore. (So be cautious.) It is possible to draw new objects, text, etc. over or under the attached group, but this kind of group will be maintained as it is "forever and ever...." as it really is a new object.
Before beginning a drawing in MG, one or two minutes of reflection can be quite useful. The advantage of this is not to be underestimated. One or two minutes can save one or two hours of modifying lines, changing text and so on, as is common with other well known programs. The incredible simplicity for moving, cloning or resizing objects and groups in MG, makes it child's play to finish a part of a drawing in a few minutes. Then, group and view. (More about viewing later on). Once the drawing is grouped and viewed, it is safe and we can continue with the next step.
As we have given so much importance to groups in MG, let's find out what the tools are for working with them:
 and ungrouping:
  that we know from past versions.
 and the new "ungroup everything" button:
 Those buttons work in a straightforward way. They do what they
promise to do. However, there are some subtle differences that must be
explained. For the two general buttons to work, the objects must be
selected (selected objects are red color). To use the
ungroup, we first select a group. Then, clicking the ungroup button
will ungroup the objects and leave them in a selected state,
thus colored red.
The third one works just by clicking it. All the objects on
the screen, singles or groups, selected or not, will be grouped and the group then
selected.
The fourth doesn't care about selections of any kind. It is the
same It is the
same to whether some groups are selected and not. It will ungroup everything
-with the exception noted. But, it will ungroup all the objects and leave them
in a NOT selected state. Finally, for attaching objects it is
necessary to group them and immediately to click the attach button. The
group will be converted to a new object (so, be careful).
One last thing to be said about groups is that their use makes it easier to select objects. In fact, when a new group is created, it is placed over the last object created on the screen ( as it is the last object). One way to change the order of objects and to make one of them the "last one" is simply to select it, to group itself alone and to ungroup it. It will be placed over all the rest on the screen. The user should experiment with this mechanism as it is useful with selection (one of the points to improve in the TO DO list of MG).
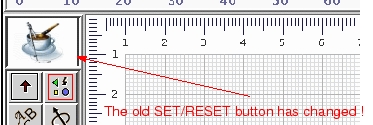
This has been totally changed. The new way is very simple and
convenient. When something is drawn on the screen and we want to see it "the
real way" or to save it, both things are done just by clicking the
ghost button:  When this button is clicked two things takes
place: on one side the file is processed and the "ghostview" screen launched
(more precisely, gv in Unix and gsview32 in
Windows). It will appear on the screen with the drawing done "up to the moment".
Adotionally, a couple of new files with the general name:
graf_num.mp and graf_num.bmg are created in the directory
files, where "num" is a number beginning with 1 and
increasing one unit every time the ghost button is clicked. (More about the
distribution of directories in this release later on).
When this button is clicked two things takes
place: on one side the file is processed and the "ghostview" screen launched
(more precisely, gv in Unix and gsview32 in
Windows). It will appear on the screen with the drawing done "up to the moment".
Adotionally, a couple of new files with the general name:
graf_num.mp and graf_num.bmg are created in the directory
files, where "num" is a number beginning with 1 and
increasing one unit every time the ghost button is clicked. (More about the
distribution of directories in this release later on).
In this way just by viewing the drawing, we save a copy of it. However, when exiting MG by clicking
the "bye bye" button:  , all the files saved
with the name graf_num.* in directory files will be erased.
If we begin another MG session and open this directory, it will be empty of
those files. So, our drawing is safe temporarily. To save it
"forever and ever" we must click the save button:
, all the files saved
with the name graf_num.* in directory files will be erased.
If we begin another MG session and open this directory, it will be empty of
those files. So, our drawing is safe temporarily. To save it
"forever and ever" we must click the save button:  and
choose a name and a directory to put it. Sometimes, it is convenient
to give it a name and save it in the directory files.
This will not be erased upon exiting via the bye button if its name does
not begin with "graf". We must mention that if MG is closed by clicking the
closing button on the external window, no files will be deleted.
and
choose a name and a directory to put it. Sometimes, it is convenient
to give it a name and save it in the directory files.
This will not be erased upon exiting via the bye button if its name does
not begin with "graf". We must mention that if MG is closed by clicking the
closing button on the external window, no files will be deleted.
It is a good practice to group the drawing before saving it. Many times you will also find that once a part of a drawing is finished and saved , you can delete leaving your screen less cluttered, and then continue working.
All the points related with "saving" are in a close relationship with those related with "recovering" or opening
To recover a part of a picture already saved and deleted from screen, we
have to click the open button:  and choose the file to paste.
Just by clicking open, the drawing will be pasted on the
screen in the same place, and exactly as it was when we saved it.
(The old bug when recovering files with text written in TeX/LaTeX, has been fixed.).
If you want to substitute a drawing
for the current one (that is, not paste a drawing onto the
drawing on the screen), then press CTRL key before clicking the open button.
The drawing on the screen will disappear and the saved one will take its
place.
and choose the file to paste.
Just by clicking open, the drawing will be pasted on the
screen in the same place, and exactly as it was when we saved it.
(The old bug when recovering files with text written in TeX/LaTeX, has been fixed.).
If you want to substitute a drawing
for the current one (that is, not paste a drawing onto the
drawing on the screen), then press CTRL key before clicking the open button.
The drawing on the screen will disappear and the saved one will take its
place.
In both cases, saving and opening, it is possible (and simple) to open any directory to save or open the file.
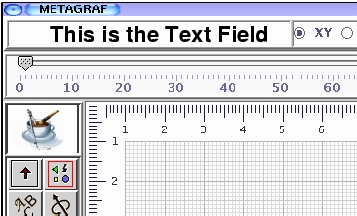
A new way for writing and editing simple text in drawings has been developed. The upper left part of MG's screen with the label with the name of the program has been replaced by a relatively small text field. Although small, the text scrolls at the end of the visible text field, so text of any length can be written.
 and click and drag on the
screen. A red line will be visible and as before the text will have its
center on the first point clicked.The length of the line drawn doesn't
matter. Just a point is enough (but you will have difficulties in moving or
selecting it afterwards).
and click and drag on the
screen. A red line will be visible and as before the text will have its
center on the first point clicked.The length of the line drawn doesn't
matter. Just a point is enough (but you will have difficulties in moving or
selecting it afterwards).
After clicking the right mouse button, your text will appear, and if you
continue to work, you will see that the text field has been cleared.
You can write as many texts as you want and place them anywhere.
To edit any text already inserted in a drawing, click a
couple of times over the line of the text. Then you will see this text appear
once more on the text field where you can edit it.
Once done and before any other action, the correct button: ![]() ,
at right must be clicked. You will see that the text on the screen has
changed to the new one.
,
at right must be clicked. You will see that the text on the screen has
changed to the new one.
So, to modify any written text on screen the steps are:
The old editor has been maintained for two reasons. First, it is
needed if we want to input some lines of written text on the drawing. As it
is known, we can write direct metapost code in the editor and then place it
in the file just by clicking the metapost button:  and
then over the screen. Second, it allows one to modify a final file by hand
(some details, text .... and so on) and to save it in this modified state.
and
then over the screen. Second, it allows one to modify a final file by hand
(some details, text .... and so on) and to save it in this modified state.
We have decided to let "nature as it is" and did not change the standard cursors. After designing the "perfect cursor" for every need, we have realized that it changed not only with every O.S., but also with many window managers in Linux. So, back to the standard used by Java. Let's say a couple of words about them.
In Windows, the standard cursors are the cross-hair (not very small) one and the vertical hand closed but one finger extended. In Unix, the same cross-hair (but smaller) while the hand is horizontal and also smaller and with a finger extended.
Anyway, when we see the cross-hair cursor it means that if we click on the screen a new object will be created. We must be careful about that. Often times we just want to select an object to move or resize/reshape it but we have forgotten to go from the "create objects state". Then, just as we are about to click the mouse button, we realize our mistake and click the right button of the mouse. The little hand with extended finger is there and clicking once more we see our object selected (red) as we wanted. The work continues; we are happy with it and at some moment we want to see/save it. We click the ghost button and ... nothing happens. Let's see why.
Suppose that the last object created was a rectangle. We have not deactivated the "create object state" and we have done a very short click with it before correcting the mistake. But this "very short" click has been enough to create a problem. The object has been created, but with width and hight zero, so we don't see it on the screen. Nevertheless it is there, and it has been translated to MetaPost when saving the file. Then to view the drawing, the file is processed but metapost does not tolerate such errors and does not finish compiling the file. Hence, no postscript output.
A good practice is to always return to the "hand-state" of the cursor as soon as we have created anything. Just click the right button. Other programs use all three mouse buttons and you must know what to do every moment looking to your right at to try to break the code of the small drawing. MG only asks you to click the right button every time you create an object. That's all.
Just in case you make this mistake and you realize it, the best thing to do is to try to select the point of the unwanted, minimal object and delete it, since it will be clearly seen if selected even though a minimal point. If you remember exactly where you have clicked and you are working in "snap-to-grid" mode, it can be possible (although difficult) to select it. An easier way is to click and drag the mouse (little hand with extended finger) in a small rectangle around the zone where our short click has been done. The point will appear clearly if it is inside. Finally, if there is a mess of lines, curves, text and everything, the best thing to do is to select and group everything and immediately ungroup with the standard button. Doing that, all the objects will be selected, so in red, and we will be able to see our point.
Now let's say something about the structure of directories used by the present MG's distribution. The entire MG program, including the Java virtual machine, can be downloaded and installed directly from the Web. Once the installation is completed, you will find a master directory with the name "metagraf". In this directory there will be one file and five directories that make up the MG system. Moreover, there will be some other files/directories created by the installer. The core of MG is the file metagraf.jar where all the Java classes are included. The five directories that come with MG are: "images", "src", "manual", "scripts" and "files".
In the scripts directory we have included all the scripts needed to use the facilities for visualizing, writing, launching the helping applications (ghostview...) and so on. These scripts can be edited, if needed, in order to to suit the user's environment better. However, before doing so, it is necessary to understand how they work. When the ghost button is clicked, depending on the state of other buttons and/or variables, Java gives instructions to run some script to create a couple of new files and put them in the directory "files".
What matters now are the scripts, in particular the pair va and go, with or without ".bat" extension (Windows or Linux). If we look at them we will see that, basically, they do one or two tasks. In the case of "va" it simply runs metapost (mpost) on the file created at this very moment and launches ghostview (gv) to see the drawing created by metapost. If we compare it with "go", we will see that ``go'' does the same as "va" but the file created is run trough LaTeX, then through "dvips". The final postscript file is viewed with ghostview as before. So, in some cases LaTeX is used and in some others it is not.
The reason for all that is the fact that we can include text written
or not. One of the strongest points of MG is it's impressive
capability of using text in so many ways as will be seen. We can write
mathematical formulas or curved text or use standard postscript fonts ( we have included just a few ),
we can scale this text in horizontal or vertical sense, or make the text slanted...etc.
But if our drawing has no text, it is not necessary to run the final file trough Latex.
There is a special button to let Java know which choice to make. This is the
GV-PS button:  This must be clicked if we want to use text.
Otherwise, we will not be able to see our files, although the mp files created will be o.k.
If we forget which state we are in, there is a
small window that indicates the current state, tex or
latex. Specifically, if we don't need LaTeX, then we must see this label:
This must be clicked if we want to use text.
Otherwise, we will not be able to see our files, although the mp files created will be o.k.
If we forget which state we are in, there is a
small window that indicates the current state, tex or
latex. Specifically, if we don't need LaTeX, then we must see this label:
![]() . But if we need to process the file
trough LaTeX, this other label must been:
. But if we need to process the file
trough LaTeX, this other label must been:
![]()
Finally, another point to mention is that if you use the simple "va"
script, you will have your drawing in the same place as it is on MG's screen.
But, if you want to process trough LaTeX, the drawing will be displaced to
the top-left of the screen. (If you do not like that, you can always place
a couple of minimal points in the upper corners of MG's screen.)
 . One way of doing is to draw a right line and
put an arrow at the end, change the color to blue and click the
copy button 15 times. Then, by placing the end of the extended finger of the
cursor over the line and clicking and dragging the mouse, we can posotion each
copy as desired. However, it is a lot quicker to make a first copy of
the arrowline, move it to its place, click the "group and select
everything" button and once more click the copy button. Moving the group is
easier than movin a single arrowline. Now, move the group
(it is easier to move a group than a single arrowline) and after
putting the second group in place we repeat the operation.
In the end we need only four operations instead of 15.
. One way of doing is to draw a right line and
put an arrow at the end, change the color to blue and click the
copy button 15 times. Then, by placing the end of the extended finger of the
cursor over the line and clicking and dragging the mouse, we can posotion each
copy as desired. However, it is a lot quicker to make a first copy of
the arrowline, move it to its place, click the "group and select
everything" button and once more click the copy button. Moving the group is
easier than movin a single arrowline. Now, move the group
(it is easier to move a group than a single arrowline) and after
putting the second group in place we repeat the operation.
In the end we need only four operations instead of 15.


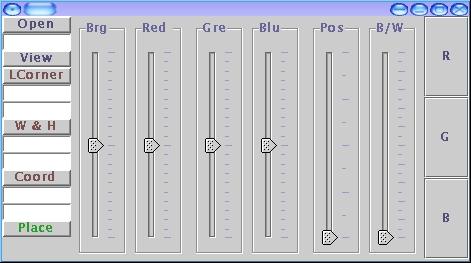

Radio buttons "XS" and "YS" control the x-scale and y-scale of the fonts. Remember that in this case x-scale means "scale along the tangent to the curve in the point", and y-scale refers to the perpendicular to the curve.
Radio button "SL" (from "slanted") means the shear in the glyphs. "PS" represents the scale for the curve. "HL" controls the position of the glyphs in a line perpendicular to the curve. If this value is apprx. "-3" the letters will be placed in the middle of the curve, which is the standard setting.
Radio button "SB" controls the position of the string of text related with the origin of the curve. If the standard null value is accepted, the text will begin at the origin of the curve. "SG" controls the separation between the glyphs.
"CL" controls the color of the curve if this one is drawn and "TH" the thickness. If this last value is null, the standard, no curve will be drawn. Any other reasonable value will make appear the curve.
The way to proceed is to write a value (number 2, for example) on the text field and click the button chosen, for example "XS". Upon doing this, a new value appears on the text field and if we agree with it for another button, we can click immediately this other button. Usually, the best thing is to delete this new value and write the desired one. In normal, not extremly sophisticated conditions, only buttons "XS", "YS" and "SG" are clicked, accepting the default values for the others.
Once given the values we must click once more on the text parameter button what makes the Parameter Adjuster Panel to disappear. Our work is finished and if we want to see the result, the way of doing is to make sure the small window under the GV-PS button displays "gv-tex", click the ghost button and ghostview will appear and display our text on the path. If we want to readjust some value, then select the curve, click once more to see the Parameter Adjuster and modify any value. It is not necessary to repeat clicks on buttons that we don't want to modify.
This is a feature added in the very last minute and has not been tested much. It will be explained what must be done and I hope to receive some feedback from the users.
In the "scripts" directory there is a file with the name "ps2mg". You can move this file to any place on your path or to let it where it is. It is an executable file in Linux. A modification of the well known "pstoedit" from Wolfgang Glunz, in a really alpha stage. (I have not sent anything yet to Wolfgang as it seems not terribly serious as it is :-)
If you have a postscript file that is a drawing with lines curved or not, you can run "ps2mg" over it (in a standard Linux console) and try to paste the result on MG's screen. Having "ps2mg" on your path or on the directory where you are working, just write on the Linux console:
and press ENTER. If the file is created without error messages on the
console, go to MG and click the "open postscript" button:  .
Choose the new file and press "O.K.". You will see appear
(hopefully) a new object on MG's screen. From this moment on, this object is
a bezier curve or a polyline of MG and works in the same way.
.
Choose the new file and press "O.K.". You will see appear
(hopefully) a new object on MG's screen. From this moment on, this object is
a bezier curve or a polyline of MG and works in the same way.
A first test which demonstrates the precission of this approach is to draw any figure in MG (without text). Then, view and save it. Then, without closing MG, use "ps2mg" on the "graf_1.1" created and expanding MG recover "graf_1.mg". Compare the pasted image with the original as it will be placed in exactly the same place.
This file will be continued/revised with new additions in the future with clarifications of points that can be difficult to understand. To do this, I need some feedback from the users telling me, simply, what is not clear or what does not work in their computers. Everyone can collaborate. Thanks for your patience.
NOTE: This file has been corrected graciously and with a lot of patience by our dear friend Richard Noel Fell. We thank him for his great job.Permission to use, copy, modify, and distribute this software and its documentation for any purpose and without fee or royalty is hereby granted, in the terms of the GPL license.